概念
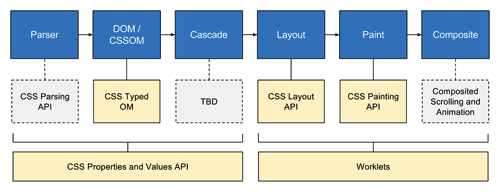
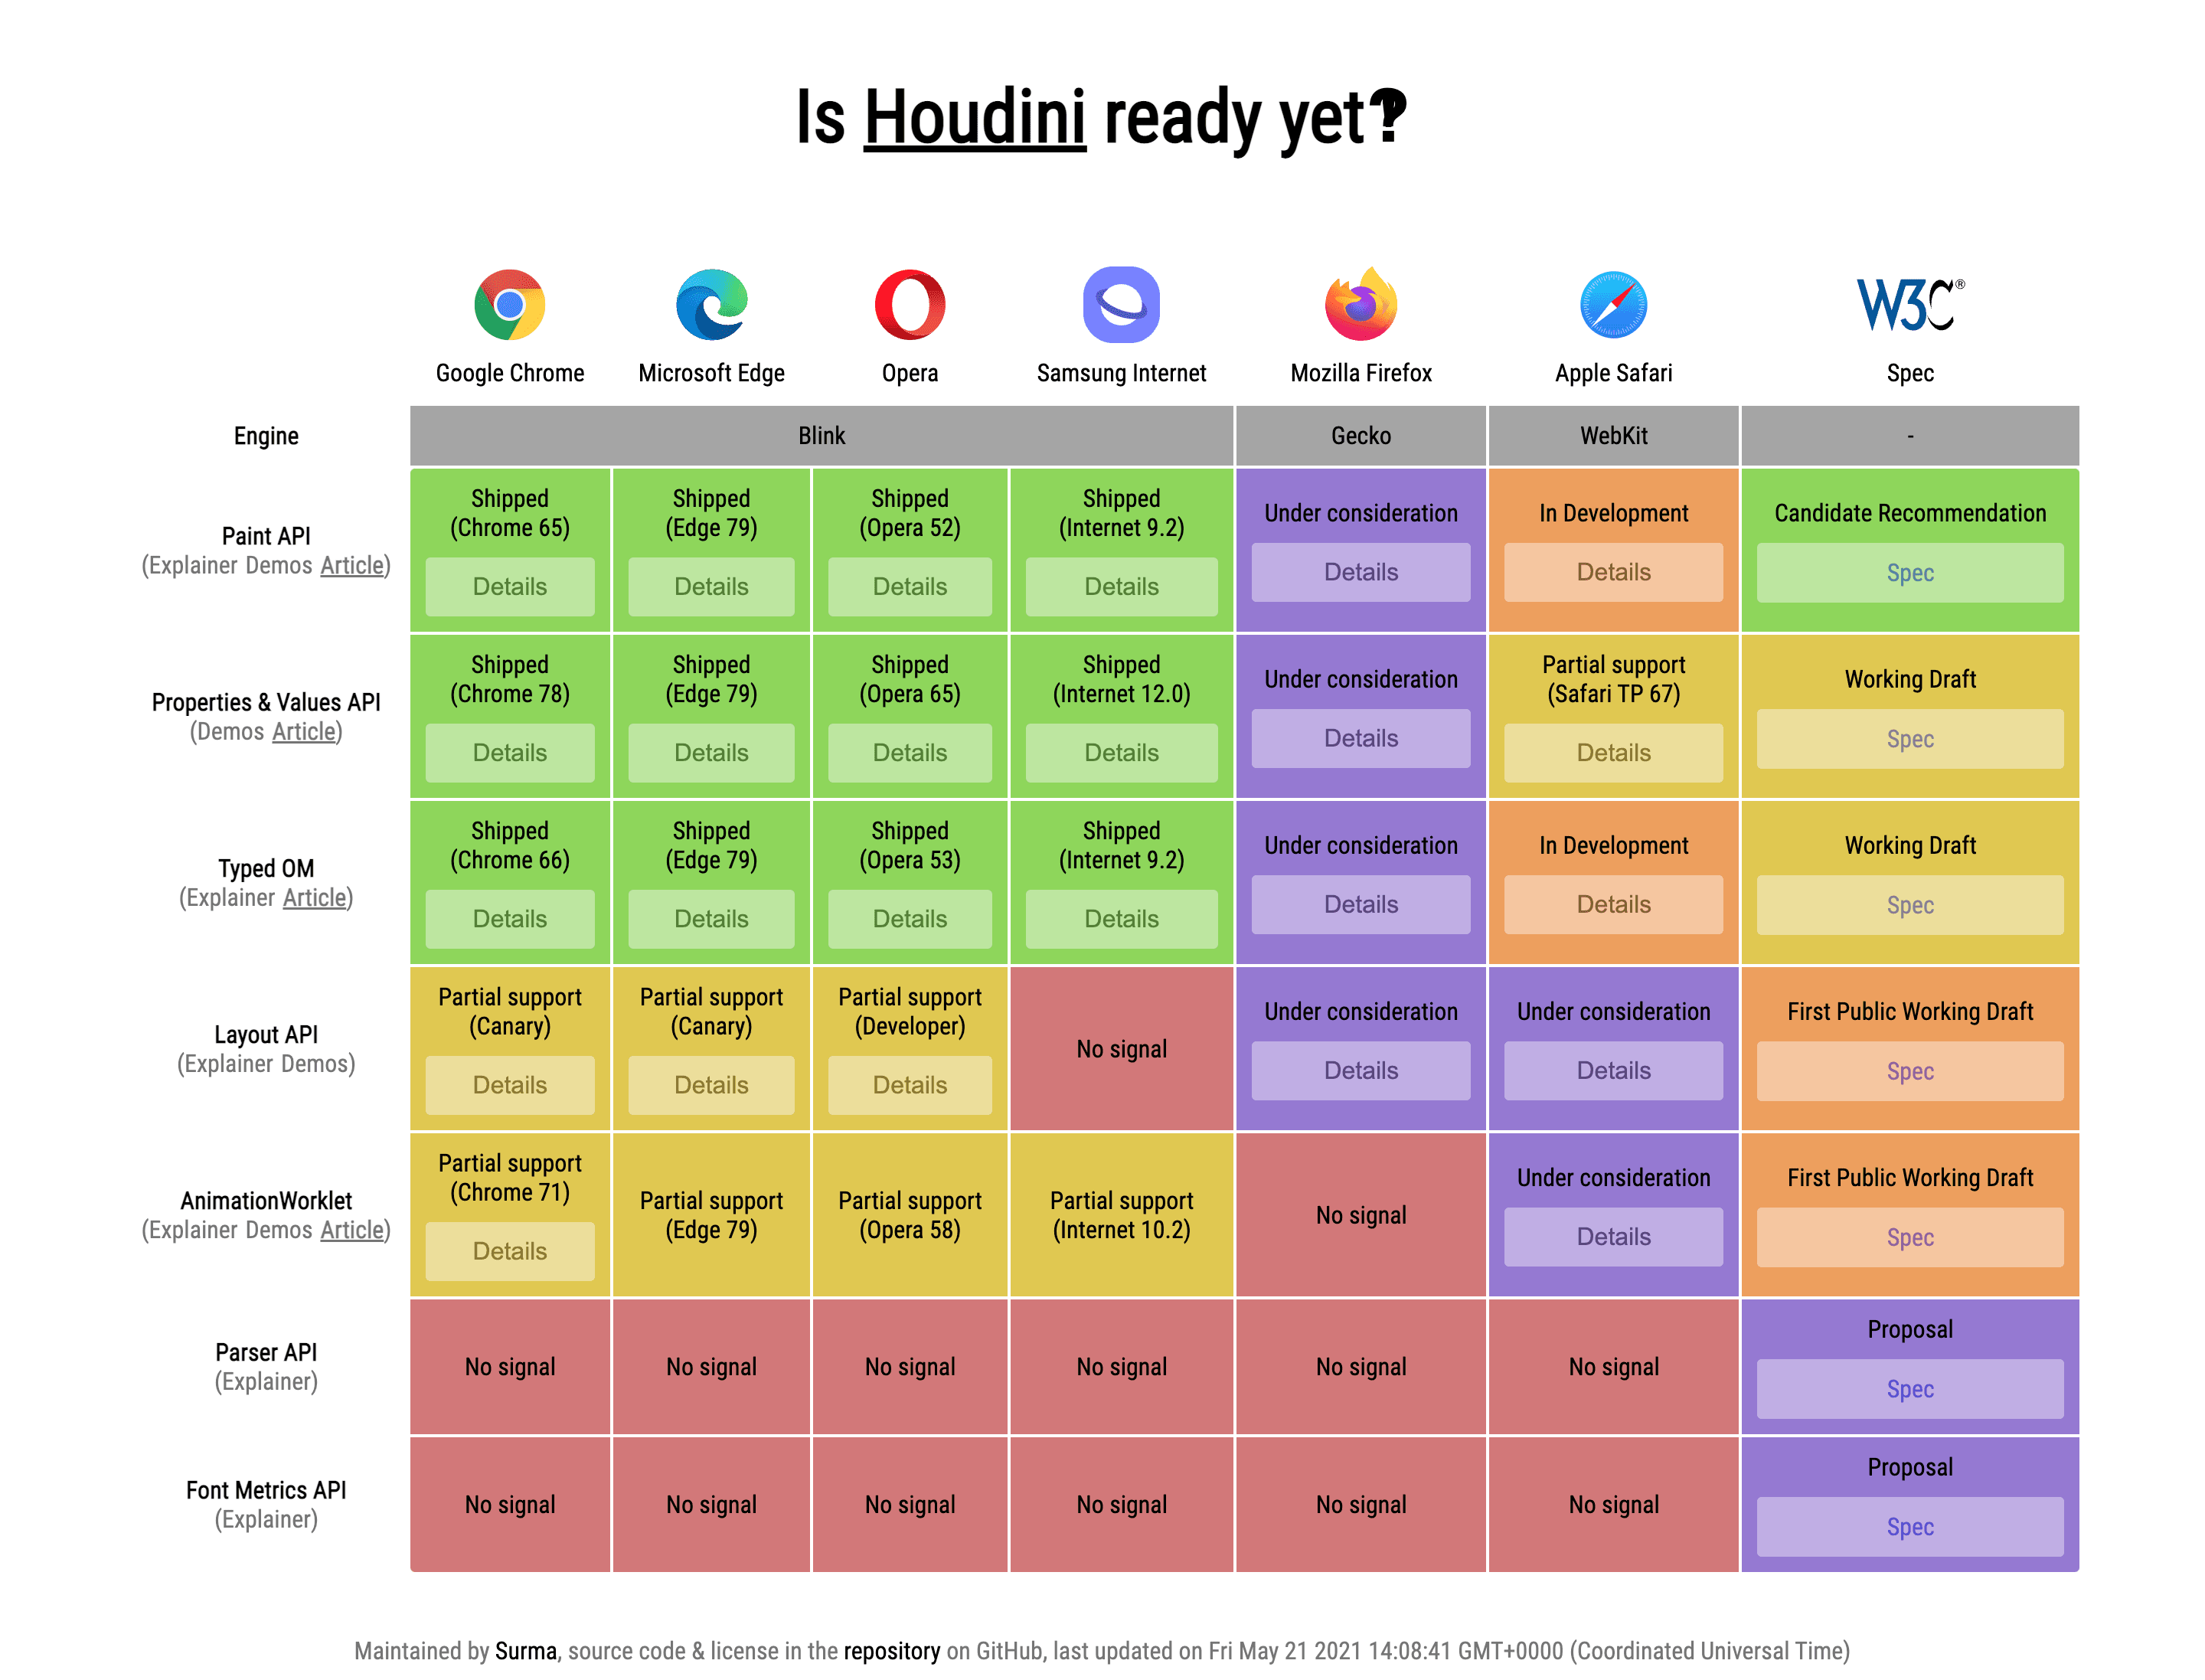
CSS Houdini API是CSS引擎暴露出来的一套api,通过这套API,开发者可以直接触及CSSOM,告诉浏览器如何去解析CSS,从而影响浏览器的渲染过程,实现很多炫酷的功能。 它主要包括Properties and Values API、Typed Object Model API、Paint API、Layout API、Animation API、Parser API、Font Metrics API等。

Properties and Values API
该API允许开发者自定义CSS属性,并告诉浏览器该如何解析。细想发现,这与Web Components有异曲同工之妙,只不过Web Components允许我们自定义HTML标签,而Properties and Values API允许我们自定义CSS属性。由此可以看出,Web发展的一个重要趋势是,浏览器会越来越多地暴露底层能力给开发者。 Properties and Values API有两种书写形式,一种是js写法:
1
2
3
4
5
6
CSS.registerProperty({
  name: '--my-prop',
  syntax: '<color>',
  inherits: false,
  initialValue: '#c0ffee',
});
另一种是CSS写法:
1
2
3
4
5
@property --my-prop {
  syntax: '<color>';
  inherits: false;
  initial-value: #c0ffee;
}
这两种写法是等价的。它做了以下几件事:
name:定义了属性名(--my-prop);syntax:约定了属性的类型(<color>,所有支持的类型可以参考W3C的标准),默认为*;inherits:规定是否可以继承父元素的属性,默认为true;initialValue:初始值、出错时兜底的值。
当我们将属性定义为<color>类型,就不能赋值给height属性,比如:
1
2
3
4
#app {
  width: 200px;
  height: var(--my-prop); /* 无效,高度为0 */
}
但可以赋值给background-color
1
2
3
4
5
6
#app {
  width: 200px;
  height: 200px;
  --my-prop: red;
  background-color: var(--my-prop); /* 红色 */
}
说了这么多,好像只说了Properties and Values API是什么,怎么用。但它如果没有好处,我为什么要用它呢? 不错。这里就举一个🌰吧。 我们知道,如果background是纯色的话,颜色切换的动画是很容易实现的,具体查看例子:CodePen。 但如果background是渐变色,然后用transition实现背景色切换,CSS就无能为力了,CodePen上可以看到没有动画效果。不过,Properties and Values API可以轻松解决这个问题。
1
2
3
4
5
6
7
8
9
10
11
12
13
14
15
16
17
18
19
20
21
22
23
24
25
26
27
<head>
  <title>cssPropertyValueApi</title>
  <script>
    CSS.registerProperty({
      name: '--my-color',
      syntax: '<color>',
      inherits: false,
      initialValue: 'red',
    });
  </script>
  <style>
    .box {
      width: 400px;
      height: 60px;
      --my-color: #c0ffee;
      background: linear-gradient(to right, #fff, var(--my-color));
      transition: --my-color 1s ease-in-out;
    }

    .box:hover {
      --my-color: #b4d455;
    }
  </style>
</head>
<body>
  <div class="box"></div>
</body>
效果可以查看CodePen。 浏览器不知道如何处理渐变的转换,但知道如何处理颜色的转换。registerProperty方法告诉浏览器--my-color是<color>类型,所以transition能够处理--my-color的转换,从而实现渐变背景的动画效果。
Typed Object Model API
过去很长时间,我们用js操作CSSOM都是这么写:
1
2
3
4
5
6
// Element styles.
el.style.opacity = 0.3;

// 或者
// Stylesheet rules.
document.styleSheets[0].cssRules[0].style.opacity = 0.3;
好像很正常额,但是,如果我们打印一下opacity的类型:
1
2
el.style.opacity = 0.3;
console.log(typeof el.style.opacity); // string
很多问号吧,类型竟然是string。 再来看看新的Typed Object Model API怎么写:
1
2
3
4
5
6
7
// Element styles.
el.attributeStyleMap.set('opacity', 0.3);
typeof el.attributeStyleMap.get('opacity').value === 'number' // true

// Stylesheet rules.
const stylesheet = document.styleSheets[0];
stylesheet.cssRules[0].styleMap.set('background', 'blue');
直接赋值变成函数操作,更清晰了。除了set方法,还有has、delete、clear等方法。更详尽的api介绍可以到MDN网站上阅读。 元素上多了两个很重要的属性:attributeStyleMap和computedStyleMap,用来代替之前直接在style对象上的操作,后面会详细讲。 而且可以看到,这时opacity的类型是正确的。 再看一个例子:
1
2
3
4
5
6
7
8
el.attributeStyleMap.set('margin-top', CSS.px(10));
el.attributeStyleMap.set('margin-top', '10px'); // string写法也没问题,向下兼容
el.attributeStyleMap.get('margin-top').value  // 10
el.attributeStyleMap.get('margin-top').unit // 'px'

el.attributeStyleMap.set('display', new CSSKeywordValue('initial'));
el.attributeStyleMap.get('display').value // 'initial'
el.attributeStyleMap.get('display').unit // undefined
Typed Object Model API增加了很多的类:
- CSSKeywordValue;
- CSSNumericValue;
- CSSTransformValue;
- …
还增加了很多有用的方法,如CSS.px、CSS.em等,效果跟使用CSSUnitValue类是一样的,就是更友好的一种形式而已。 属性值是一个对象,包含value和unit,当我们只想要数值而不想要单位时,可以减少解析这一步的处理。 总的来说,Typed Object Model API的设计让我们对样式的操作更明确了,也更像java了。
attributeStyleMap vs computedStyleMap
attributeStyleMap和computedStyleMap都是用来存放样式的对象,但两者有一些区别。 attributeStyleMap是一个对象,而computedStyleMap是一个函数。另外,computedStyleMap返回一个只读对象,只能执行get、has、entities、forEach等操作。 为什么要设计两个map?因为我们设置的样式不一定完全符合约定,attributeStyleMap是原始输入的样式,而computedStyleMap经过浏览器转换最后实际应用的样式。
1
2
3
4
5
6
7
el.attributeStyleMap.set('opacity', 3);
el.attributeStyleMap.get('opacity').value === 3  // 没有收紧
el.computedStyleMap().get('opacity').value === 1 // 计算样式会收紧opacity

el.attributeStyleMap.set('z-index', CSS.number(15.4));
el.attributeStyleMap.get('z-index').value  === 15.4 // 原始值
el.computedStyleMap().get('z-index').value === 15 // 四舍五入
小结
Typed Object Model API带来了很多好处:
- 更少的心智负担和bug:比如上面说的opacity的类型问题,可以避免
opacity + 0.5变成0.30.5。又比如,过去样式属性既可以驼峰写法也可以是横杆连接写法,现在只能是横杆连接写法(与CSS一致),我们再也不用在写法上纠结了。
1
2
3
4
5
el.style['background-color'] = 'red'; // ok
// 等同于
el.style['backgroundColor'] = 'red'; // ok

el.attributeStyleMap.set('background-color', 'red');
- 强大的数学操作和单位转换:我们可以将px单位的值转成cm(厘米),这可能在某些场景下有用。
- 值的自动修正。
- 错误处理,可以用try catch语句捕获错误:
1
2
3
4
5
6
try {
  const css = CSSStyleValue.parse('transform', 'translate4d(bogus value)');
  // use css
} catch (err) {
  console.error(err);
}
- 性能更佳:js对象转成C++底层对象要比序列化、反序列化string再转C++底层对象快。
Worklet
Houdini worlets是一套类似于web workers的轻量级接口,允许用户使用浏览器渲染阶段的底层能力。使用方式有点类似service worker,需要引入js文件,并注册模块。Houdini worlets只能运行在https或者localhost上。 Houdini worlets按功能分主要有4类:PaintWorklet、LayoutWorklet、AnimationWorklet和AudioWorklet,这里只会介绍前3类。 每种worklet对应着特定的api和特定的渲染阶段(cascade -> layout -> paint -> composite):
- Paint Worklet - Paint API - paint
- Layout Worklet - Layout API - layout
- AnimationWorklet - Animation API - composite
Paint API
Paint Api允许我们使用类似于canvas 2D的api定义如何绘制image,主要用在一些可以设置image的CSS属性上,比如background-image、border-image、list-style-image等。主要步骤分为3步:
registerPaint定义如何绘制;CSS.paintWorklet.addModule注册模块;- 在CSS里调用全局的
paint方法绘制指定模块。
1
2
3
4
5
6
7
8
9
10
11
12
13
14
15
16
17
18
19
20
21
22
23
24
25
// path/to/worklet/file.js
registerPaint('paint-color-example', class {
  static get inputProperties() {
    return ['--my-color'];
  }

  static get inputArguments() {
    return ['<color>'];
  }

  static get contextOptions() {
    return {alpha: true};
  }

  paint(ctx, size, properties, args) {
    ctx.fillStyle = properties.get('--my-color');
    ctx.beginPath();
    ...
});

// html或者main js
CSS.paintWorklet.addModule('path/to/worklet/file.js');
// 或者引用外部url,但需要https
// CSS.paintWorklet.addModule("https://url/to/worklet/file.js");
registerPaint里的类有几个方法:
inputProperties,要使用哪些CSS属性;inputArguments,CSS中使用paint函数除了模块名外的其他参数,指定其类型;contextOptions,由于使用的是canvas的2D render context绘制,所以可能会设置一些canvas上下文的选项;paint:最关键的方法,定义绘制行为。ctx的使用和canvas一致,size表示绘制的大小,包括width、height等信息,properties就是inputProperties静态方法里定义的属性,args就是paint的入参,跟inputArguments定义的对应。
CSS.paintWorklet.addModule注册模块,可以是本地路径,也可以是外部的url。 最后,在CSS里使用
1
2
3
.example {
  background-image: paint(paint-color-example, blue);
}
Houdini.how网站上有很多使用Paint API实现的炫酷效果,大家可以去看看。
Layout API
Layout API扩展了浏览器layout的能力,主要作用于CSS的display属性。 基本写法如下:
1
2
3
4
5
6
7
8
9
10
11
12
13
14
15
16
17
18
19
20
registerLayout('layout-api-example', class {
  static get inputProperties() { return ['--exampleVariable']; }

  static get childrenInputProperties() { return ['--exampleChildVariable']; }

  static get layoutOptions() {
    return {
      childDisplay: 'normal',
      sizing: 'block-like'
    };
  }

  intrinsicSizes(children, edges, styleMap) {
    /* ... */
  }

  layout(children, edges, constraints, styleMap, breakToken) {
    /* ... */
  }
});
inputProperties,父布局元素使用的属性childrenInputProperties,子布局元素使用的属性layoutOptionschildDisplay,预定义子元素的display值,block或者normalsizing,值为block-like或者manual,告诉浏览器是否要预先计算大小
intrinsicSizes,定义盒子或者内容如何适配布局children,子元素edges,盒子边缘styleMap,盒子的Typed Object Model
layout,布局实现的主要函数children,子元素edges,盒子边缘constraints,父布局的约束styleMap,盒子的Typed Object ModelbreakToken,分页或者打印时使用的分割符
定义好之后使用,跟Paint Api类似
1
2
// 注册模块
CSS.layoutWorklet.addModule('path/to/worklet/file.js');
1
2
3
.example {
  display: layout(layout-api-example); /* 作为一种自定义的dislay */
}
目前CSS已经有很多种布局方式了,我们还需要Layout API吗?当然需要,做过移动端开发的同学应该知道,瀑布流布局(Masonry)是很常见的。如果我们根据业务定义好这Masonry布局,下次再遇到同样的需求,就可以直接复用了。网上已经有人实现了Masonry布局,大家可以参考一下。
Animation API
扩展浏览器动画的能力,能够监听scroll、hover、click等事件,提供流畅的动画效果。 基本用法:
1
2
3
4
5
6
7
8
9
// 定义动画
registerAnimator("animation-api-example", class {
  constructor(options) {
    /* ... */
  }
  animate(currentTime, effects) {
    /* ... */
  }
});
amimate:动画的主要实现逻辑
currentTime,时间线上当前的时间;effects,动效的集合。
1
2
3
4
5
6
7
8
9
10
11
12
13
14
15
16
17
18
19
20
// 注册,异步函数
await CSS.animationWorklet.addModule("path/to/worklet/file.js");;

// 动画要作用的元素
const elementExample = document.getElementById("elementExample");

// 定义关键帧动画
const effectExample = new KeyframeEffect(
  elementExample,
  [ /* ... */ ],   /* 关键帧 */
  { /* ... */ },   /* duration, delay, iterations等选项 */
);

/* 创建WorkletAnimation实例并运行 */
new WorkletAnimation(
  "animation-api-example" // 前面定义的动画名
  effectExample,              // 动画
  document.timeline,          // 输入时间线
  {},                         // constructor的参数
).play();
动画的知识点非常多,不是本文所能涵盖的。 网上有人用Animation API实现了以下的动画效果,具体可以参看这里。 
可以用了吗
 目前只是部分主流浏览器实现了部分API,要谨慎使用,最好判断浏览器是否支持再使用,或者借助polyfill。
总结
Houdini API是一套功能强大,暴露CSS引擎能力的方案;- 优势明显,比如:更友好的API、轻松突破以往CSS有限的能力范围、性能提升;
- 浏览器实现程度不是很好,很多API还在草案当中,有些API的使用需要借助polyfill。本文并没有提及
Parser API和Font Metrics API,这两个还在提案阶段,以后变数太大; Houdini API还是很值得期待的,大家可以持续关注下。
参考资料
- https://www.smashingmagazine.com/2020/03/practical-overview-css-houdini/
- https://ishoudinireadyyet.com/
- https://developer.mozilla.org/en-US/docs/Web/Guide/Houdini
- https://drafts.css-houdini.org/css-properties-values-api/#supported-names
- https://web.dev/css-props-and-vals/
- https://developer.mozilla.org/en-US/docs/Web/API/CSS_Typed_OM_API
- https://developer.chrome.com/blog/cssom/
- https://houdini.how/
